Hey everyone…
I’m not a professional programmer, but I can put together the basics in most languages given a few hours to remind myself of the syntax… which may make me quite a typical Bubble user. So I decided to write a plugin with a server action using some basic javascript code, thinking it would be quite easy. Boy have I just been round the houses on the most basic issue of how to read input fields. Before I forget the pain and the details, I want to document it here for all those who follow in my footsteps!
First, before you go anywhere on plugins, I recommend doing the wonderful Plugin Development course from the @copilot guys. Click here for the details.
Text Inputs - The Easy Bit
So text inputs are pretty easy. Define them like this:

And then in your code you can get the value you specified using the syntax:
properties.text_in
Text Output - For Action Running on Server
Define your “result” outputs like this:

And then in your javascript, write to the output with the line:
return {"text_out": myText};
where myText a text variable you have created within your code. Just don’t forget the quotes around “text_out” as I did for a short while.
Text Output - For an Element Action
In this case, you define an “Exposed State” of the element in the same style as shown above. The code to write to these outputs is:
instance.publishState("text_out", myText);
Custom Type Input - Not at All Obvious!
Wow, this part took me hours and hours to work out. I just couldn’t find one place to give me the answer, things I read were talking in slightly too technical javascript gobbledegook, and sometimes forum post I read were not quite accurate.
But YEAY, I have just worked it out. I’m so happy…
So this is for an input which is of absolutely any type you have defined yourself… so maybe a type called “Contact”, or “Event”, or “Invoice” for example.
The first thing is you need to define your input to be of type “any thing” like this:

Now the next part depends on which kind of action you are defining…
For an Action which runs on the Server…
Then you have to realise that when you try to access this input (properties.anything), it will probably be empty (null in javascript parlance), even though you specified a value in your workflow. That is because, as a user defined thing rather than just a piece of text, it needs getting from the database. So first you need the line:
properties.anything.get();
( For an Action which is part of an Element… you don’t need to do this - in fact the above line will throw an error.)
And to save yourself typing the “properties.” bit the whole time, it can be useful to define a variable for this:
var anything = properties.anything;
which will send the plugin off to the database to go and fetch it. There is a bit of an issue around the timing of that process and whether your function will run more than once, which you can read about in the manual - click here for all the details.
Now it exists in your code… but how on earth do you access its field values?
Well firstly, you need to run a very special function to see what the fields have been renamed to now they are in javascript land. Execute this line of code and send the result to a text output or the console:
x = anything.listProperties() + "\n";
(If you don’t have the + “\n” part concatenated, you may need to convert the type to a string, so with the line:
x = toString(anything.listProperties());
This gives you a big comma separated list. It is easier to read with each field name on a new line, which with a bit of javascript digging around, can be done like this:
t = x.replace(/,/g,'\n');
which globally replaces the commas with a new line. Then you end up with a usable list of the field names, which will look something like:
first_name_text
deleted_boolean
number_number
start_date3_date
(note that the names may not match your Bubble field names if you have been renaming some of your Type’s field names in Bubble)
And then… you can access the values of the individual fields with the syntax:
t = anything.get("first_name_text") + "\n";
(assuming you defined the variable
var anything = properties.anything;
as shown above).
Wow, what a journey… and one that I hope will save lots of time for many enthusiastic Bubblers in the future.
Good luck! ![]()
But wait… there is more…
As I start to apply this, here are more of my learnings…
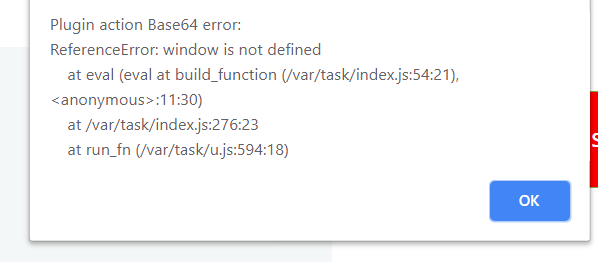
Specifying the Thing on the Action in Your Workflow
So when you call up your nice new server action in a workflow, you have to be really careful. What is the difference between these two?
![]()

Yes, it is the word “value”. For some unknown reason, when calling up a plugin server action, Bubble lets you specify the name of an input, as well as the name of the input’s value. In all other areas of Bubble, you can’t do this! Beware, as without the important “value” part, you will not pass a value on to your plugin and the get() function will always fail!
Working with Lists of type “any thing”
With a list of type “any thing”, you first need to get the whole list from the database… and it is best to store this in a variable to make access easier later on. So if your input field is called “anythinglist”, then you need the line:
var anythinglist = properties.anythinglist.get(0, properties.anythinglist.length());
(note two things - the () after length, and the fact that we use length() rather than length()-1 )
Then to access the field of a specific item within the list, you can use the standard javascript array syntax [i] on anythinglist, followed by the .get() function:
t = anythinglist[i].get("first_name_text") + "\n";
(and this coding is the same whether you are creating an Action or an Element Action)
Protecting Against Getting Something That Isn’t Specified
You also need to be careful to test in your code that there actually is a value on the input before you do the get function. Do this by testing that the input field exists in the first place:
if (properties.anything) {properties.anything.get();}
Passing Values Back Out - Server Side
The plugin I have been working on has server side outputs defined as follows:

To write to these, use the code:
var my_title_out, my_email_out, my_messaging_out;
// lots of data processing...
return {"title_out":my_title_out, "email_out":my_email_out, "messaging_out":my_messaging_out, "error_out":false};
Passing Values Back Out - Element Based Client Side
I have created a similar element based client side plugin, so it has the same outputs (or “Exposed States” in this case) defined as follows:

To write to these, use the code:
var my_title_out, my_email_out, my_messaging_out;
// lots of data processing...
instance.publishState("title_out", my_title_out);
instance.publishState("email_out", my_email_out);
instance.publishState("messaging_out", my_messaging_out);
instance.publishState("error_out", false);
Performance of Server Actions
Expect Server Actions to take a while longer to run than client side actions, as they have to be packaged up and send off to an AWS Lambda environment to be run…