The error is when clicking on print, sometimes it will load all the images and other times it won’t.
the editor is locked for editing.
This page I showed only has a print function.
The error is when clicking on print, sometimes it will load all the images and other times it won’t.
the editor is locked for editing.
This page I showed only has a print function.
hey @MindForApps ,
I sent the following e-mail to you. today Just wanted to highlight it here again maybe this is more convenient. Would appreciate your feedback and keep it up!
Question:
Can I somehow let the user inject his own CSS / HTML for editing parts of the text?
Two use cases:
Can I add a bubble button/workflow which would add additional <span class=> for a selected text into the HTML? The CSS could be somewhere on the bubble page (as an HTML element).
p>Hello, please click <span id="actionWord" onclick="bubble_fn_click()">here</span> to open the popup.</p>
Not an expert so forgive me if I am butchering something here. I just want to provide more custom CSS to the end-user.
Thank you and I look forward to hearing back from you, regards Pat
P.S. One thing I was able to do is, appending the to the content to the end of it. But not in between a text (Append text workflow)

Hello!
I can’t say anything about points 1 and 2 yet. I need to look into this issue. The fact is that there are many nuances here and I still don’t understand how this can be implemented correctly.
If something works out then I will report it.
At the moment I have added a new action: insertHTML
.

.
Inserts an HTML element or HTML string or plain string at the current cursor position
“Advanced WYSIWYG HTML editor” automatically removes unnecessary tags and classes when adding third-party code. And this is correct (reasonable) behavior. This removes excess “garbage”.
But you can override this behavior.
By default, the following tags are allowed:
_defaultTagsWhitelist = br|p|div|pre|blockquote| h1|h2|h3|h4|h5|h6|ol|ul|li|hr|figure|figcaption| img|iframe|audio|video|table|thead|tbody|tr|th|td| a|b|strong|var|i|em|u|ins|s|span|strike|del| sub|sup|code|svg|path|details|summary
If you want to allow the use of tags not included in this list then you need to use the fields “addTagsWhitelist” and “pasteTagsWhitelist” with which you can expand the default list.
Regarding the “class” attribute:
To prevent the editor from removing the “class” attribute from the code you paste, you need to use the “allowedClassNames” parameter (which I just added). Here you can specify the allowed classes, those that will not be deleted. You can use regular expressions or just list the classes and separate them with “|”
For example ‘^my_|class_2’ will resolve all classes that start with “my_” and class “class_2”

Example:
we want to insert HTML :
<span class="my_class" style="font-size: 18px;"> Hello <span style="color: red;">World! </span></span>
if we do not specify ‘^my_’ in the “allowedClassNames” field, then the editor will delete the class and we will get:
<span style="font-size: 18px"> Hello <span style="color: red">World! </span></span>
Please update the plugin version (v1.0.15)
I hope this helps you.
Good luck.
This works! Awesome update man! Thank you I really appreciate it. I will continue to play around with it but I was already able to achieve one of the use cases and will try out the second one tomorrow.
Hey @MindForApps
One more thing that would be awesome : Any chance, it would be possible to add “read-only” mode where nothing is editable anymore and we can hide all buttons and menu bar etc.
Also, probably stupid question. But, how do I use the HTML generated by Advanced WYSIWYG text editor on my bubble pages? I save the HTML in a thing and load it via HTML element. BUT bubble seems to overwrite a lot and the text does not look like in the editor. When I take the HTML and put it into any HTML preview/editor on the internet I can see that it clearly works. So, it must be on the bubble side. Do I need to adjust anything?
Hello!
Update v1.0.16
I think that it is not advisable to make one parameter responsible for this.
You can approach this issue more flexibly:
hideToolbar - hides the toolbar

resizingBar - enables/disables “resizingBar”

Further, for example, you can use the “Page is loaded” event to additionally select the parameters you need:
Then, as necessary, you can enable or disable various functions: show/hide editor, enable/disable editor, show/hide toolbar, enable/disable toolbar, enable/disable readOnly
Regarding the use of the HTML element in Bubble:
The editor adds its own styles (usually through classes) for some elements: tables, lists, etc. I am sure that there are many ways to correctly display code in an HTML element.
The first thing that came to my mind now was to wrap the code in a div with an editor class. And before this div, place a link with editor styles.
Like that:
<link rel="stylesheet" href="https://cdn.jsdelivr.net/npm/suneditor@2.45.1/dist/css/suneditor.min.css">
<div class="sun-editor-editable">
PUT YOUR HTML HERE
</div>
If you use “katex” for mathematical notations, then you need to add styles for that too.
<link rel="stylesheet" href="https://cdn.jsdelivr.net/npm/katex@0.16.0/dist/katex.min.css">
If you use an HTML element on the same page on which the plugin instance is located, then do not insert links (styles) for suneditor.min.css and katex.min.css because they are already on the page from the editor itself.
editor styles: 54.1KB
styles “katex”: 22.5KB
This is the first thing that came to my mind. But there is probably something simpler.
THANK YOU! I think, I was able to implement all of this and now it looks exactly like I wanted it. Thanks again for being so responsive and helpful it means a lot to me.
I am still wrestling with the “onclick” part. tried various things but I am just not technical enough to know what I am doing… Here is what I am trying:
Here is what I tried in the settings:
Again, I have no clue what I am doing so apologies for these many questions. I am trying to get a working MVP up so that at some point in the hope that at some point I can hire somebody to help with technical details
I can see WYSIG is not anything besides the stuff that is necessary for my span class:
Hello!
Well, in fact, there are no problems with ID. It’s just that ID is not a tag - it’s an attribute. Therefore, here you need to use the parameter: “attributesWhitelist”
But there is a problem with using “onclick”. The fact is that the library code is programmed to remove attributes associated with actions starting with “on” (onclick, onhover, etc.). And here I can’t change anything. This way you won’t be able to call the function from HTML. But you can bind to an ID for this.
Here’s a small example:
1. We pass the following HTML to the editor:
<p><span style="font-size: 22px; cursor: pointer; color: rgb(0, 85, 255);" id="show_popup"><strong>CLICK TO VIEW POPUP</strong></span></p>

here we use two attributes: style and id
let’s add them to “attributesWhitelist” (id|style)
(so that these attributes are not removed from the inserted HTML)

2. Place the “JavascripttoBubble” element on the page, give it a suffix (for example, “show_popup”) and enable “Trigger event”

3. Place the “HTML” element on the page and use the script in it:
<script>
$('html').delegate("#show_popup", "click", function (event) {
bubble_fn_show_popup();
});
</script>
where we write “#show_popup” which is equal to the ID that we used in step 1
this is to catch the “click” event on an element with id=“show_popup”

4. In workflows, select “JavascripttoBubble” and in it we will use the element from point 2
.
.

.
And here you can launch any action you need.
For example, in the demo I open a popup
Here is the editor for this example:
I very rarely use “Toolbox”; perhaps this could have been done differently.
hey, Wanted to let you know I got it working. Thank you for your help. Your support makes this plug-in truly the #1 in my eyes. And tried all the different RTE from the plug-in section.
I do have another question/request. I am not able to remove the grey border of the RTE. I have changed settings “editing area border” but I think this adresses something else.
What I am trying to achieve: I just want the editor to look like e.g. a Multiline input without borders and other stuff. At least, in some instances like when I am not editing.
vs.Hello!
I am very glad that I was able to help you and that everything worked out for you.
The editor has this design: it consists of many blocks, which in turn are made up of other blocks.
The editor menu section “Editing area borders” is responsible for setting the boundaries of the editing area (block). But the editing area, in turn, is located in another block (i.e., wrapped in another block). It is the border of this outer block that you want to change.
I just added the “outer borderColor” parameter - this will allow users to change the color of the outer border (the block that wraps the edit area).

if this field is empty, the default color will be used (different depending on the dark or light theme)
So, if you are not interested in color but want to completely hide this border, you can choose any color and make it transparent (0%)

Well, you can remove the “Bottom resizing bar” through the editor settings:

Please update the plugin to 1.0.17
Very timely, I was just about to ask about this.
Thanks for the update.
Hi There - is there any way to customize the colors used in the dark theme? I would like the editor’s dark theme to match the colors I use for my site’s dark theme.
One more question - is there a way to remove the grey dashed border around images?
Hello!
When developing this plugin, we considered the possibility of making a section with custom color scheme settings.
But more than 100 parameters are responsible for setting the color scheme. And if we made fields for all these parameters in the plugin editor, it would greatly complicate the settings menu and make it simply huge. And it seemed to us also not advisable to make settings not for all parameters, but only selectively. It is for this reason that we created built-in themes.
But you can use custom CSS to customize selected color scheme options.
For example, to change the gray dashed border around images you can use the following code:
<style>
.dark.sun-editor .sun-editor-editable[contenteditable=true].se-component {
     outline: 1px dashed #3d3d3d;
}
</style>
put it “header” in the “SEO/metatags” tab
here:
outline: 1px dashed #3d3d3d00;You can find the rest of the color parameters in this file:
https://dd7tel2830j4w.cloudfront.net/f1665915359042x464327912613179650/WYSIWYG_Editor.dark_theme.css
If you have any questions, please contact us and we will definitely try to help you.
Good luck.
This is super helpful - thanks!
FYI - For updating the dark theme colors, in my conditional where I switch to the dark theme, I added also changing the “defaultStyle”, and set the “color” and “background-color” properties to what I wanted. This allows me to change the color of any text set to the default color.

I’m struggling with this plugin. 1. the autosaving resetting the focus to the first character makes it unusable for editing. Other plugins are able to handle this (although none of them very well) but reliably keeping the cursor position would be a start. 2. how is i t that the same content on two different browsers has a completely different style? Is there a way to fix this? Here are two images from two different browsers of the SAME content.
All of the great work in creating customizable components is for nought if the basic stuff doesn’t work. In a couple of situations, the plugin has erased the content I had in the cell because of the combination of “Autobinding” and “Initial Content” settings. Having to set both is non-standard. You either “Autobind” which is meant to be auto-save by default or you use Initial Content and capture an action to save/overwrite it.
I’m having to set both of these for autobinding to work and even then, it keeps brining the cursor to the first character and makes the editing unusable.
Am I doing something wrong?
By default, the editor tracks changes to the “initial Content”. Those. if the initial content changes, the editor will reboot.
If autobinding is enabled, then when the editor content changes, the data that is used as the initial content is overwritten. The editor becomes overloaded and focus is lost.
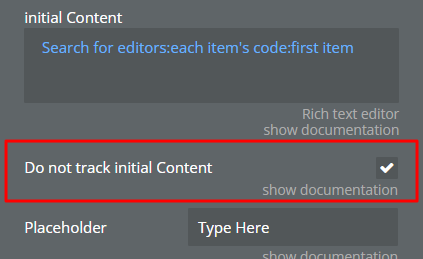
Just check the “Do not track initial Content” checkbox - and the editor will not track changes to the initial content.
The fact is that in the first versions there was no auto-binding and naturally there were no these questions.
After we added auto-binding, we needed to make the “Do not track initial Content” checkbox active by default. Yes, this is our omissionб we will do this in the next update.
As for different styles, it’s not entirely clear. I just checked in several browsers and didn’t notice this problem. Please give a little more information.
On point 1., adding “Do not track initial content” is the opposite of autobinding. So essentially, the tool doesn’t do autobinding because it can’t prevent the lost focus issue. This is disappointing. That said, there are almost no RTE fields that handle this well in Bubble, but I’m surprised at how this one handles it worse than even the free plugins.
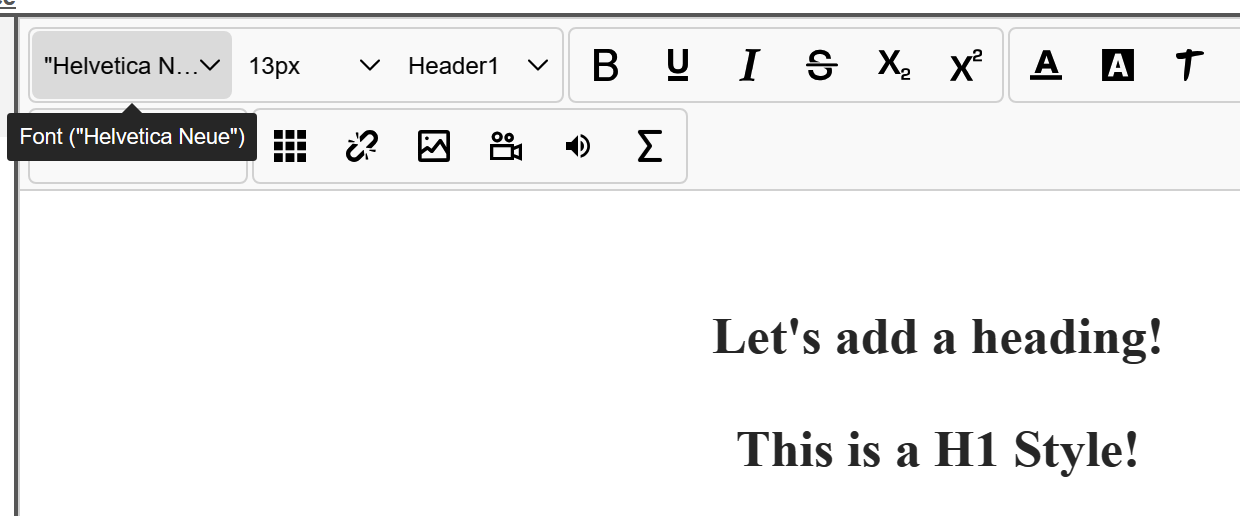
For 2. (the differing styles), it looks like the H1 style somehow became “Helvetica Neue” which is not in the font list, so my assumption is that each browser is defaulting to a different “default” H1 style if it can’t find the one within the editor. Would that make sense?
I thought I must have pasted in Helvetica Neue in myself but it appears that the editor is defaulting to Helvetica Neue in sections. For example, if I highlight everything and hit “Remove Format” everything becomes Helvetica Neue. Did you have Helvetica Neue in the font list and then remove it?
Once I correct the font and chose one within the font list, it corrected it across both platforms.
The editor uses the “Helvetica Neue” font by default and if the system does not have this font, then the default font is used.
But I think that I am now adding the “Helvetica Neue” font to the plugin code and it will work even if this font was not installed on the system before.
Once this is done I will publish an update to the plugin.
Now for point 1
You just need to check the “Do not track initial Content” checkbox and that’s it. “Do not track initial Content” does not cancel auto-binding in any way. When auto-binding is enabled, any content changes made by the user will be immediately recorded in the database. Your initial content will load and auto-binding will work perfectly.
As I understand it, you didn’t even try to check what I wrote to you.
Please check how it works first.
Thanks for the feedback. Unfortunately, I have spent hours on this last night and today but given your inquiry I thought it might be worth documenting for you the behavior I experience depending on how the three fields (Autobinding, Initial Content and Don’t Track) are set.
I fully anticipate that I might be doing something wrong, but this isn’t rocket science. I found that I had to capture the save button myself and add the “Make changes” step myself and that the plugin doesn’t do it. Is that correct? Am I missing another workflow I should be completing on behalf of the plug in?
For each test I pre-loaded the database with the simple content and attempted to load that data so that I can edit and save it reliably.
Here are the results…
Autobinding = ON / Initial Content = EMPTY / Don’t Track = OFF
Expected Behavior: Initial content should load, be editable and persist via incremental saves.
Experienced Behavior: Initial content doesn’t load and is overwritten upon entering the editor field with blank paragraph codes which I can’t type in here otherwise it just makes white space. Unusable.
Autobinding = ON / Initial Content = EMPTY / Don’t Track = ON
Expected Behavior: Not sure this is a legal combination of settings, but theoretically, initial data should load via the autobind and then it shouldn’t save unless you hit “Save”. However, my guess would be that the Don’t Track field is moot here as you can’t half-autobind which means we should expect the same behavior as 1.
Experienced Behavior: Indeed, it is the same behavior. The data is held in the database and is overwritten when I enter the blank initial page presented by the editor. Unusable.
Autobinding = ON / Initial Content = DYNAMIC FIELD / Don’t Track = ON
Expected Behavior: Again, it doesn’t seem like a legitimate combination but my guess would be that maybe it loads the data but wait for a “save” to commit.
Experienced Behavior: The data is held in the database and is overwritten when I enter the blank initial page presented by the editor. Unusable.
Autobinding = ON / Initial Content = DYNAMIC FIELD / Don’t Track = OFF
Expected Behavior: Again, it doesn’t seem like a legitimate combination but my guess would be that maybe it loads the data but wait for a “save” to commit.
Experienced Behavior: The data is held in the database and is overwritten when I enter the blank initial page presented by the editor. Unusable.
Autobinding = OFF / Initial Content = DYNAMIC FIELD / Don’t Track = OFF
Expected Behavior: Initial content should appear and any changes made should be committed because Don’t Track is OFF.
Experienced Behavior: Data initializes as expected. Doesn’t autoupdate. Save button commits changes. This is usable provided you want to force your customer to save data and risk the loss of their data during the editing process. The situation also appears to be susceptible to double update issues. Will need to build a “locking” feature so that this can be made production-ready. If I remove my own Make change statement from teh “Save” button workflow, nothing happens and all changes are lost.
Autobinding = OFF / Initial Content = DYNAMIC FIELD / Don’t Track = ON
Expected Behavior: Initial content should appear and any changes made should be not be committed until the “Save” button is pressed.
Experienced Behavior: Does not initialize the editor with existing data. Any data written and then committed via the Save overwrites existing data. Unusable.
In summary, there is one combination of the 6 that appears to provide a workable solution and only if I write the workflow that commits the changes to the database. Please assist in any way you can. I would like autobinding to be an option, but for that to happen, the initial content needs to load and not be overwritten as the user enters the editor.