
Hi everyone,
I get tons of questions about app and development organization, so I decided to put together a basic guide to help set up a framework. I shared this with some of my students and wanted to post here as well in case it’s able to help anyone else.
Whether you’re keeping your app organized for yourself or other people (investors, users, partners, etc), staying on top of organization is important because it gives you the option to do things like:
- Bring investors/partners/outside developers on board and explain or integrate them into development seamlessly
- Remember why and how you built certain aspects of your app from the start, and thus be able to make logical decisions on how to scale
- Move through development quickly without having to search or spend too long finding things in your app
Here are a few tips for organization –
1. Use Trello (or another project management app)
For every app I build, I keep a thorough and detailed Trello board.
If you’re not familiar with Trello, it’s a project management app that lets you create boards, tasks, lists, due dates, and even have conversations all in the same place (plus a lot more). It uses a Kanban-style organization system so you can create and manage projects in an efficient way.
My boards typically have columns labeled:
- To Do (tasks still needing to be done in the app)
- In Progress (tasks I’m currently working on)
- Complete (tasks that are officially complete)
- Bugs (areas of the app that need to be fixed, addressed, updated, etc)
You can also have boards that keep running tabs on different parts of your app, like:
- Workflows
- Integrations (with login info or other details)
- On-hold items
- And more — whatever’s relevant to your application’s history and progress
Not only should you keep track of these things in Trello, you should make them as detailed as possible…
If you put a bunch of hours into your app and then have to step away for a week, for example, what would be easier to come back to:
- Looking at your “in progress” tasks and seeing things like “pop ups,” “login error,” or “chat widget”
- Looking at your “in progress” tasks and seeing things like “create pop up with welcome message to show after user sign up,” “user’s email address is not being saved properly in database when they sign up,” or “need html to embed Olark on index page (username: X, password: X)”
The more detailed your notes are, the easier it’ll be to jump into your app and continue the momentum you had when you last stopped. Otherwise, you could easily be left spending 30 minutes or an hour just searching through your application to see where you left off. It’s just not efficient.
On top of that, make sure you go in and update Trello every single time you make a change in your app.
2. Use Bubble’s built-in “notes” feature
Did you know you can take notes directly in your Bubble editor?
You can find this notes section by going to your property editor and clicking the text bubble icon in the upper right corner.
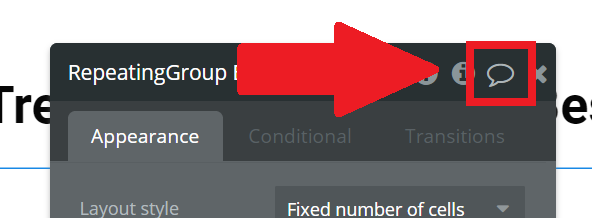
Once you click the icon, a notes section will pop out, and I encourage you to use it consistently.
Here’s what it looks like:

You can even click on “see all” in the upper right corner to go through all your notes in one place.
I encourage you to explain and/or describe the different elements you build and use in your app. Doing so will not only help you remember important details, but if you need to guide others through your app at any point, it’ll be incredibly easy for them to get a lay of the land.
I use the notes feature extensively as it’s an excellent way to keep track of important information not only right in the app itself, but actually attached to the specific elements or aspects they’re relevant to.
3. Take detailed notes each time you deploy
Every single time you deploy your app, leave detailed notes in the description.
I can’t stress this enough.
Sometimes, when you deploy changes in your app, things you don’t expect to happen, do.
Things like:
- Workflows breaking as a by-product of whatever update you made
- Future changes revolving around previous updates (which you need to refer back to and understand)
- Needing to revert back to a previous version of your application
When you don’t make notes about the changes you’ve made when deploying, you won’t be able to know what happened, when it happened, and why. That can lead to you unnecessarily having to revert back to even earlier versions of your application and rebuilding things that were otherwise perfectly fine.
It can be like a snowball effect.
I know it seems simple, but when deploying, take detailed notes! Every time you deploy, you can also read your notes on what your last deployment entailed.
It’s an easy step to take for a lot more organization and efficiency.
4. Use the “Commit a development version” option
Similarly to taking notes when deploying, you should also make use of the option to “commit a development version.”
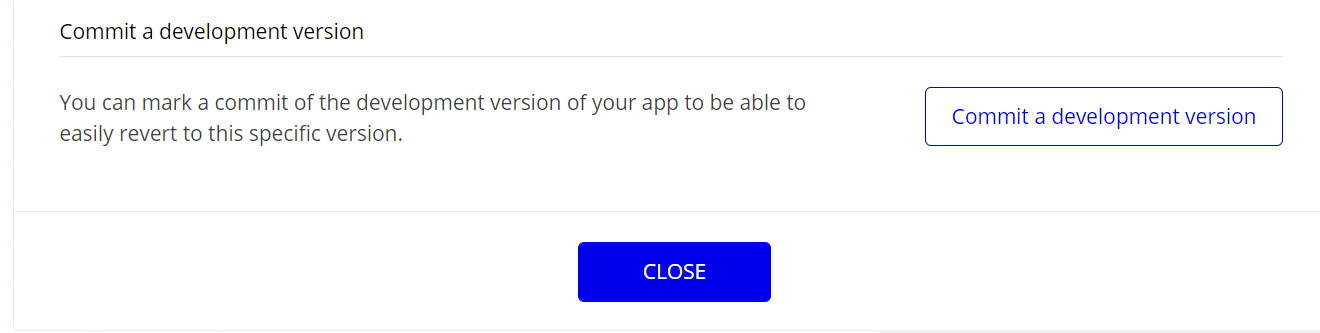
When you use this option, you’re essentially drawing a line in the sand with your app where, if you ever need to revert back to a previous version, you can do so in an organized and predetermined way.
Here’s what I mean…
Let’s say you wanted me to build the first version of your application while you spend some time learning Bubble. That way, you’ll have a jumpstart on your app’s development and can take over from there.
Now, because I know you’re still learning Bubble and might go through a bit of trial and error with your app, I’d make sure to “commit a development version” from when I transfer the application from me to you.
That means the version of your app I personally built will be locked in time, and you could always come back to it.
From there, you could play around in your app — potentially breaking workflows (or anything, really) — but you wouldn’t have to worry about your app actually breaking because you could simply revert it back to the point where I handed it over to you – it’d be in the exact same state as it was at that point in time.
This feature comes in handy in tons of situations, however. Think about the reverse, for example — maybe you’ve built the base of your app, but you need a developer to go in and fix something. In that case, you might commit a development version before handing it to them so you know exactly the state it was in before that point.
The most practical way to use this feature is when you’re making significant updates to your app. If you’ve launched your MVP, for example, and are iterating as you gather user feedback, you can mark each major update as a development version.
That way, if an update unexpectedly breaks other aspects of your app, you can simply revert back.
5. Use Notion
I’ve tried a lot of note taking and project management tools. My favorites are Trello — which we talked about before — and Notion.
Notion is a simple, yet powerful tool for outlining projects and their overall “flow.”
For example, during the process of updating one of my courses, Notion was the perfect tool to outline the flow of that project (of course, this can easily apply to any app, too).
Here’s a screenshot of the original content outline (in Notion):
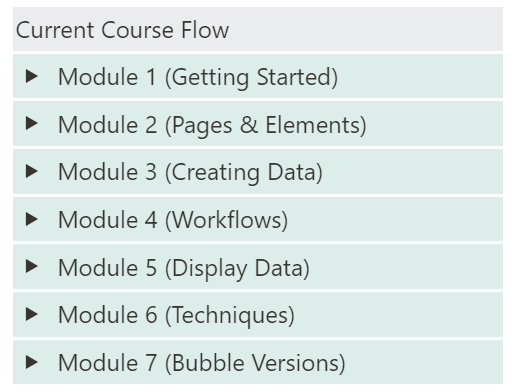
When you toggle the arrows on the left, the categories expand, like this:
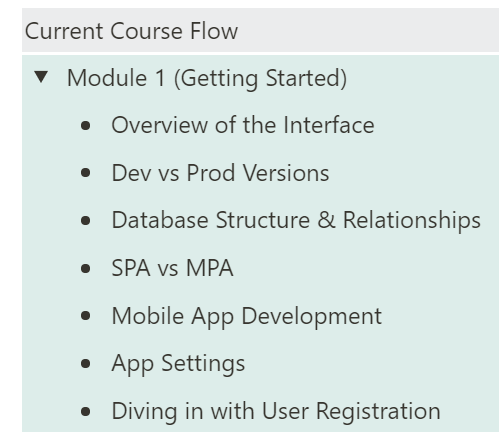
As I updated the course, I outlined the current course “flow” in another column, like this:

Toggling the left arrows expands each module to show the contained content, and within that content are more toggles for additional subcontent.
You can even color code your notes and outlines:
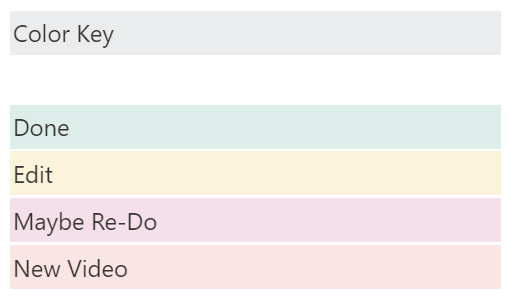
This is an excellent way to manage large projects, and especially how you want to map out the overall user journey and development flow for your app.
In reality, you can take notes like these in Trello, but I prefer using Notion to organize user flows or large outlines when I’m brainstorming or planning logistics at the start of a project. It can also be used for more specific cases, like keeping track of workflows and logic in your app, for example.
6. Do a little trial and error
At the end of the day, what works for me might not work for you — not because these methods aren’t great for organization, but the way my brain analyzes and intakes information might be different from the way yours does. Not only that, you might just not like the specific tools I use.
If that’s the case, do some trial and error of your own, but use these tips and techniques as a starting point.
At a minimum, start taking thorough notes within your app if you aren’t already. But also consider outlining or tracking progress with a tool like Trello or Notion (or both). It’ll help you now and in the future.
7. Bonus
I can’t let myself end this without one final note…
Label everything!
As your application grows, so, too will the number of elements, groups, repeating groups, reusable elements, and so much more.
Trying to pinpoint anything specific in your app can be next to impossible if you haven’t labeled things correctly.
As you build, create a simple name for each element you put on your pages.
Like this:
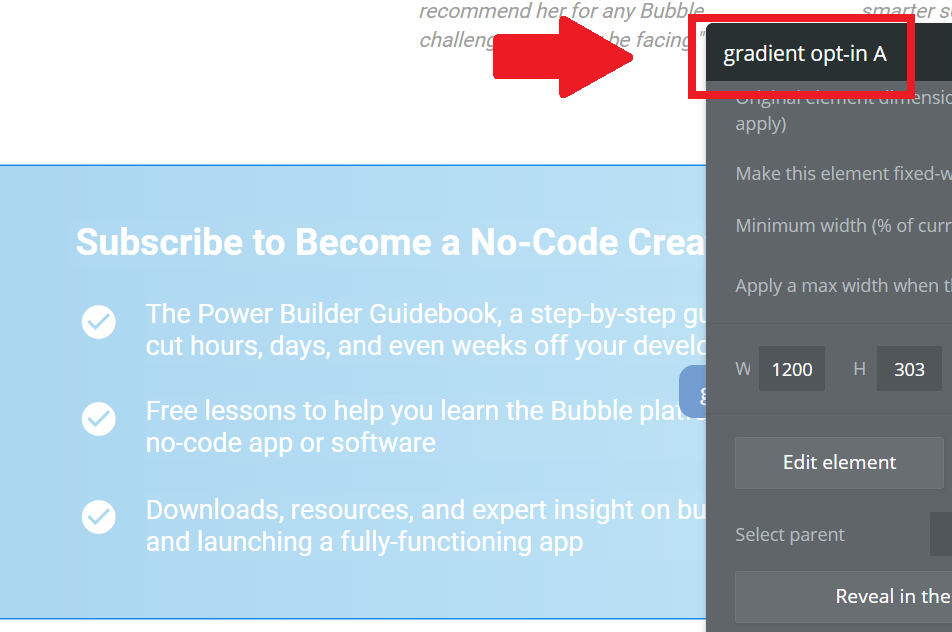
Not only will this keep your app much more organized, it’ll also cut way back on the time it takes to find and adjust elements in the future.
Remember, organizing your app isn’t just for your own sake…it’s for the sake of partners, investors, and even future users.
What do you think? Do you organize your app and development process in any particular way you’ve found helpful? I’ve found this to be really particular depending on how you tend to process information. What’s your take?
-Gaby
Join our Facebook group for insider access to no-code development
Get professional development services
Enroll in expert-led courses and products


 ).
).