
Does anyone have experience hosting Adobe Typekit fonts in bubble apps? Freaking adobe stuff is so convoluted, but dang do they have some nice fonts 
3 Likes
Do you get a URL to the font file from them?
1 Like
well not exactly…they give the option of declaring selectors for css class, id and html tags then “add that to my markup”
or I can insert some tags into my html.
also, it has to be the html that my URL is associated with, which I declare in typekit.
there’s an “idobe id” associated with usage. creative cloud limits the amount of urls I can host typekit fonts on. unless of course I upgrade to the shiny package for like a million dollars a month
1 Like
Also interested in using typekit in case anyone has a solution…
2 Likes
I up-vote this
I know this is a few months old, but I’m interested as well! Any luck with typekit?
This one requires working with a bit of code, so you’ll need a code editor. I use visual studio code but any will do.
You’ll also need a typekit subscription (they have a free tier, which is what I’m using - it works just fine)
- On typekit, find the font you want to use:
- Create a kit with the desired font:

2.1) Here we add our domain name. For this walkthrough, I’ve used only one domain, version-test. You can have up to ten domains on one kit though:

- Copy the two lines of code, tags and everything. Press continue and publish your kit:


- In your Bubble app, navigate to Settings > SEO & Metatags. Paste the embed code into the Script/meta tags in header field.

- Now, open up your text editor and create a new file:

5.1) Save the file as a .css file and descriptive file name:

-
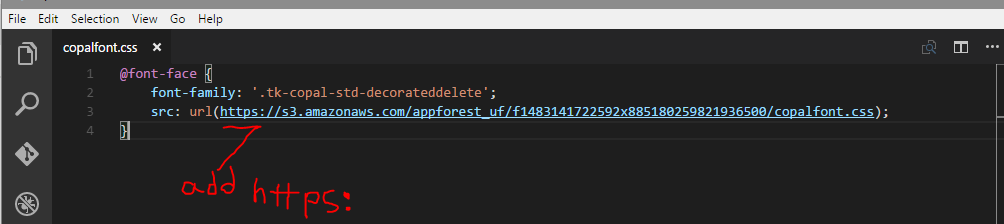
Add the following code into your css file.
@font-face {
font-family: “.tk-copal-std-decorateddelete”;
src: url()
}
6.1) The font-family should be the “Selector” located in your typekit kit.

- After you save your new css file, move back to the Bubble editor and build an “Upload file” element anywhere on your canvas. Upload the new css file with the “static file” option. Copy the “dynamic link”:

- Now, back in your code editor, paste the dynamic link in between the parenthesis in the
src: url()part. You must also add https: to the beginning of the dynamic link address
-
After you save the modified CSS file containing the URL, return to your Bubble editor, clear the initial static content in your File Uploader element and upload the modified css file.
-
Return to the Settings Tab > General/Design. Paste the new dynamic link you’ve copied into the css style path. This time, there isn’t any need to add the https:

- In the Font name field, add the name of the font. You can find it in typekit here (leave the quotes off):


-
Add your font.
-
Back on the canvas, you’ll find you can now select your new font:

But wait, it’s not displaying on the canvas?!? Argghhhh…
…Psych! Just preview the app and it loads:

Anyways, I hope this is useful. If there are any mistakes in the walkthrough, let me know. If you have any questions or something’s not clear, let me know. If your app blows up, please let me know, because that’d be funny ![]()
11 Likes
So great, @skylershelton, thanks! Looks like the key to the whole thing is pasting the two lines of Typekit-generated script tags in the “SEO & Metatags” section (I never would have found that).
Two questions:
- If you can add arbitrary code to the head of the document, is it necessary to upload a static CSS file? Couldn’t you just write the same @font-face declaration under the script tags you just added?
- If it is necessary as you describe, is there any other way to upload an arbitrary file to Bubble, or do you have to create a file upload input on the canvas somewhere every time?
Thanks man!
1 Like
@nathan.huening Thanks for the questions, apologies for taking awhile to answer!
Regarding your first question, although that’d be much simpler, it unfortunately wouldn’t work. The “SEO & Metatags” section essentially opens up the <head> tag. Because this is HTML, and @font-face is CSS, it wouldn’t work. We could likely put a <link rel href> there and reference the stylesheet containing @font-face , but Bubble needs to know we’re adding a font so that it can be displayed and selected within the editor’s font drop down menu.
Basically my best guess is that the “add font” feature does both those two things (adding the proper tag in the html and adding the font name into the drop down). The css file link completes the href='font.css'.
Exploring other ways to utilize the head tag here is something I’ve been doing a lot of and I plan on sharing some of the things I’ve done later this month.
To your second question, the file upload element, along with the image upload and possibly others, is the only method I’m aware of for uploading to the AWS S3 object storage associated with your app.
I’m pretty sure that the S3 storage is referenced by app, so that once the file is uploaded, it only gets deleted upon deletion of your application. In other words, once you have the URL it’s fine to delete the element. It’s a pretty slick way to access AWS S3 
As an aside, I’m no Bubble guru. This is the way I approach it - if you or anyone else has an alternative/better method, let us know!
If the “SEO & Metatags” section just exposes the <head>, couldn’t you just as easily include custom CSS? Plese do correct me if I’m wrong, but I do stuff like this all the time:
`
@font-face { font-family: 'MyWebFont'; src: url('webfont.eot'); /* IE9 Compat Modes */ src: url('webfont.eot?#iefix') format('embedded-opentype'), /* IE6-IE8 */ url('webfont.woff2') format('woff2'), /* Super Modern Browsers */ url('webfont.woff') format('woff'), /* Pretty Modern Browsers */ url('webfont.ttf') format('truetype'), /* Safari, Android, iOS */ url('webfont.svg#svgFontName') format('svg'); /* Legacy iOS */ } body { font-family: 'MyWebFont', Fallback, sans-serif; } ` Or whatever. Like, you can put style rules in the head of a document just as easily as you can `` to an external stylesheet. You'd have to include it on every page that uses the font since it's document-specific (not included site-wide), but wouldn't that work? Am I totally wrong?Can’t wait to see your other experiments!
1 Like
I’m pretty sure that wouldn’t work. You need to have a stylesheet and the font name to add the font into the bubble editor anyway, so if you write the css in the head or you write it in a css file and upload it, it’s the same idea. I’m thinking it might be possible by using the exposed tags for SEO purposes feature to declare the rules, but it wouldn’t be practical - it’s far easier to just select the font family from the drop down and be on a merry codeless day.
I’ll revisit it later if no one else does but for now I’m content
1 Like
Does it work if you call the font before the css file? That should allow you to use the css and have the font referenced in the editor.