Hello!
Is it possible to move an image within a workflow?
I just want to move an image a few pixels to the up and left, relative to its original position.
Best regards
Hello!
Is it possible to move an image within a workflow?
I just want to move an image a few pixels to the up and left, relative to its original position.
Best regards
Maybe you can copy and paste the image in a new location and hide it. Then set the workflow so when you click on the original image it hides that one and reveals the new one.
Sounds something like the right solution. Haven’t seen that it would be possible to move an element.
are you just trying to have switch from one place to another or do you actually want it to move across the screen?
I wanted to move it on the screen, but your workaround helps as well!
There’s another really cool way to do this. Here’s how it works.
If you want to move an element left 20 pixels, then put a group around the element. Make sure the group is flush with the element on the right side and allow for 20+ pixels of room on the left. Then, set the group to have a 20 pixel border on the right side (based on some condition). Set the border color to 100% transparency. There you go. It’ll move the element to the left by 20 pixels based on whatever condition you set. Don’t even need a workflow.
Additionally, you can add a transition to this to make the invisible border appear gradually (making your element slide across the page). Pretty slick looking imo.
Also, if you need to trigger this from a workflow (instead of use the conditional logic) then probably easiest to create a custom state and have the workflow change it from no --> yes or something like that. Then, set the conditional logic to trigger when that custom state is yes.
Enjoy!
Thank you! This works great!
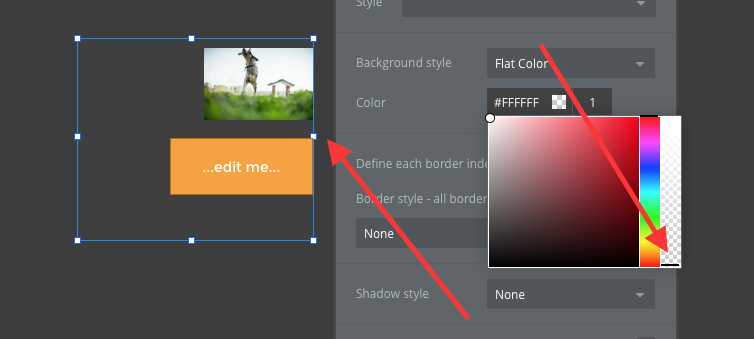
The only thing is that I cannot make the border transparent and I have different colours in the background  So there is no workaround to make the border colour transparent.
There is, it’s just not obvious. It’s that slider on the right of the color scale. Drag it to the bottom. That’ll make it 100% transparent.
I’m intrigued to see this solution. Proper workarounds are really cool and if @sridharan.s nailed it… (Y) Bubble holds so many complex features. You just have to find how to dig them out and put them together.
My apologies @Eneas if I didn’t really encourage you to look for other solutions than what was presented in front of you.
Thanks again! The colour is transparent now!
Interestingly, I can move the image just to one side. I have played around with flush on the bottom, top, left, right etc. The only border that works for moving the inside image is the left border of the group. All other borders just cover the image. However, I’m sure that the image was flushed on the correct side but it didnt’ work for e.g. other borders as the left one. Confusing.
You’re welcome.
It should work in all directions. You just need to make sure 1) the group is flush with the opposite side and 2) there’s enough extra room within the group on the side where you want it to move.
Note - if you want to move a group left and then right again (later) you can just have the border disappear to move it back. You could also start with a transparent border and then have it shrink to size 0 to make the element move toward that side.
Brilliant!!
This works great!!! In combination with transitions it gets even better!!
However, I have found a bug: When I hover over the inside image (after I have changed the border), the images moves as expected!
Great, glad it’s working for you!
I don’t follow your bug explanation. Could you share a video or a link to either your editor or the app?
Well that’s pretty neat! 
It sound very easy, but don’t get it. Any link example? I’m sure I’m trying something harder 'how to move a button or picture inside a group.
John, your screenshots look fine. Perhaps you’re missing another step.
Here’s a quick demo in the forum app.
Editor: https://bubble.io/page?type=page&name=slide_element&id=forumapp3&tab=tabs-1
Preview: https://forumapp3.bubbleapps.io/version-test/slide_element?debug_mode=true
Very wyse… and yes, I was completely missing it 
Thanks for the example. You find this alone or I’m missing some doc? :))))
I found it alone. Wished there was more / better documentation but seems like the Bubble team is focused mostly on improving the product (which is probably the best use of their limited resources anyway). The forum is a pretty good place to turn too.
In my experience, learning Bubble is like learning a development language. So, it takes a while to get going with it at first. But, once you get the hang of it, then you can really coast.
Additionally, I’ve used 1:1 sessions with @levon to build our app – and that was a great way to quickly learn all of the foundational items because I could see Levon do things and ask him why, etc. Also, CoBubble seems to be a great resource when you get stuck and need some help.
Hahaha You cheat with Levon ![]() My one on one session starting next week.
My one on one session starting next week.
And yes, it is a totally full development language. I will never go back to lines of code. Even my team (i’m technically not a programmer) work on Bubble and they love it (they don’t want to admit it) ![]()
Bubble is a difficult learning curve to grab concept, and it take some (lot) practice. But we have to admit it, we love it!
Just added the hover effect on the button itself. ![]()
Hey Scott! amazing solution you found ! i wouldn’t have thought of such an option for moving images well done!