Dear Bubblers’ I’ve recently seen many topics of people requesting help for PWA and Push Notification support in Bubble and I’d like to share with the community how I have managed to make things work.
I’m certain that this implementation can be made more efficient, and if you know how to do so, please pitch in so we can all make a definitive go-to manual for this.
I do have to say that this has been built by trial and error, and using very valuable input from other bubblers in this forum which at the moment I don’t recall, but if I where to find those posts, I’ll make sure to tag them along.
I have been able to get this approach to work on 4 of my 5 production apps, the 5th one throws constant errors and I had to end up removing PWA support (bubble wouldn’t get involved since it’s all custom code).
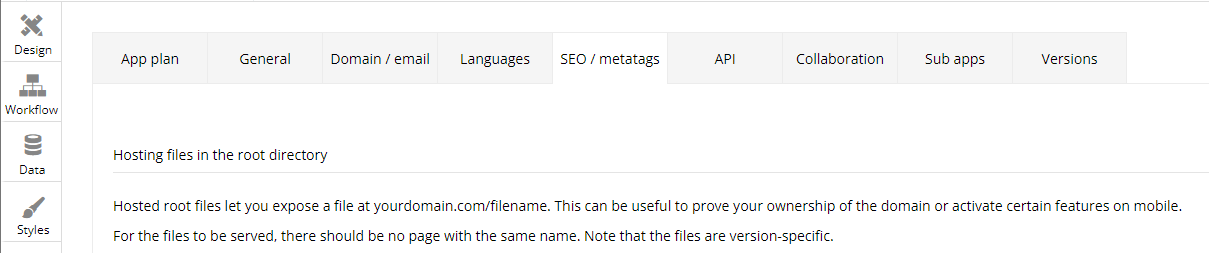
First of all, you must be familiar with uploading/hosting files to the root directory, for this, you must go to “Settings” - “SEO / metatags”. In the bottom part you will find the field “Hosting files in the root directory”.
So, we must get things ready, and understand that you’ll need your app icon files plus manifest.json file, sw.js and main.js files
First, we must generate our icons, I use https://appiconmaker.co/ service which is perfect for this, and download the following PNGs:
- icon-57.png
- icon-60.png
- icon-72.png
- icon-76.png
- icon-114.png
- icon-120.png
- icon-144.png
- icon-152.png
- icon-192.png
- icon-512.png
Yes, these are WAY more than we really need, but I prefer to have more than actually required just in case of different use cases/navigators/OS’s.
When downloading all of these icons, upload them to the root directory, you will need the URL for each to use in the manifest file next.
manifest.json
{
    "name": "Your App Name",
    "short_name": "Short App Name",
    "icons": [
      {
        "src": "https://s3.amazonaws.com/appforest_uf/xxxxxxxxxxxxxx/icon-57.png",
        "sizes": "57x57",
        "type": "image/png"
      },
      {
        "src": "https://s3.amazonaws.com/appforest_uf/xxxxxxxxxxxxxx/icon-60.png",
        "sizes": "60x60",
        "type": "image/png"
      },
      {
        "src": "https://s3.amazonaws.com/appforest_uf/xxxxxxxxxxxxxx/icon-72.png",
        "sizes": "72x72",
        "type": "image/png"
      },
      {
        "src": "https://s3.amazonaws.com/appforest_uf/xxxxxxxxxxxxxx/icon-76.png",
        "sizes": "76x76",
        "type": "image/png"
      },
      {
        "src": "https://s3.amazonaws.com/appforest_uf/xxxxxxxxxxxxxx/icon-114.png",
        "sizes": "114x114",
        "type": "image/png"
      },
      {
        "src": "https://s3.amazonaws.com/appforest_uf/xxxxxxxxxxxxxx/icon-120.png",
        "sizes": "120x120",
        "type": "image/png"
      },
      {
        "src": "https://s3.amazonaws.com/appforest_uf/xxxxxxxxxxxxxx/icon-144.png",
        "sizes": "144x144",
        "type": "image/png"
      },
      {
        "src": "https://s3.amazonaws.com/appforest_uf/xxxxxxxxxxxxxx/icon-152.png",
        "sizes": "152x152",
        "type": "image/png"
      },
      {
        "src": "https://s3.amazonaws.com/appforest_uf/xxxxxxxxxxxxxx/icon-192.png",
        "sizes": "192x192",
        "type": "image/png"
      },
      {
        "src": "https://s3.amazonaws.com/appforest_uf/xxxxxxxxxxxxxx/icon-512.png",
        "sizes": "512x512",
        "type": "image/png"
      }
    ],
    "start_url": "https://yourAppDomain.com",
    "display": "standalone",
    "background_color": "#desiredBackgroundColor",
    "theme_color": "#yourThemeColor"
}
Some would say these are too many icons, but I prefer to have more than strictly required to account for most use cases. Copy this in to a text editor (I use Sublime Text) and save it as manifest.json. Do update the required data with your own. The src: fields are all from the icons you previously uploaded to the root directory.
Now, for the service workers:
sw.js
'use strict';

self.addEventListener('push', function(event) {
   console.log('[Service Worker] Push Received.');
   console.log(`[Service Worker] Push had this data: "${event.data.text()}"`);
const title = 'Push Codelab';
   const options = {
 body: event.data.text(),
 icon: 'icon-192.png',
 badge: 'icon-192.png'
   };
event.waitUntil(self.registration.showNotification(title, options));
 });

self.addEventListener('notificationclick', function(event) {
 console.log('[Service Worker] Notification click Received.');

 event.notification.close();

 event.waitUntil(
 clients.openWindow('https://yourAppDomain.com')
 );
});

// CACHE
const cacheName = 'cache-v1';
const resourcesToPrecache = [
   '/',
   "index.html"
];

self.addEventListener('install', event => {
   console.log("SW install event");
   event.waitUntil(
   caches.open(cacheName)
       .then(cache => {
           return cache.addAll(resourcesToPrecache);
       })
       .catch(err => {
           console.log(err);
       })
   );
});

self.addEventListener('fetch', event => {
   event.respondWith(caches.match(event.request)
   .then(cachedResponse => {
       return cachedResponse || fetch(event.request);
   })
   );
});
Again, copy this code into the text editor and save it as sw.js. This is your service worker declaration. Do replace your app URL, icon: and badge: fields with the icon file name you are going to use for the app (same as used in the manifest file). I use the 192x192 size icon which works well in android/ios devices.
Finally:
main.js
'use strict';

let swRegistration = null;

if ('serviceWorker' in navigator && 'PushManager' in window) {
 console.log('Service Worker and Push is supported');

 navigator.serviceWorker.register('sw.js')
 .then(function(swReg) {
   console.log('Service Worker is registered', swReg);

   swRegistration = swReg;
 })
 .catch(function(error) {
   console.error('Service Worker Error', error);
 });
} else {
 console.warn('Push messaging is not supported');
}
The main.js file is the one responsible for registering the service workers. As you can see these specific codes serve the purpose for both Push notification activation (OneSignal is required you can follow the OneSignal plugin tutorial for this) and App Install.
Upload them all to the root directory.
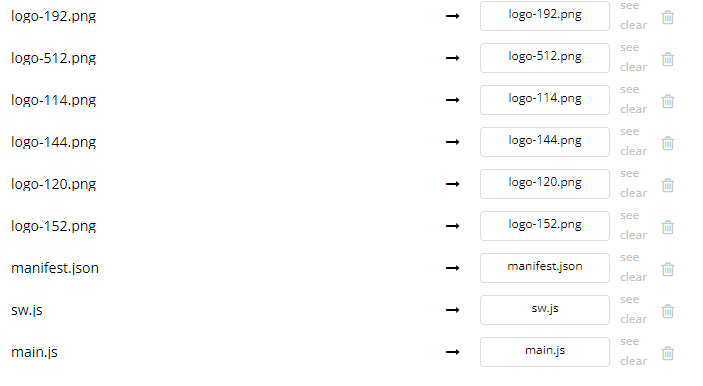
In the end, your SEO / metatags files should look something like this (I replaced Icon with logo on my file names, but you can use the original file names as described above):
Next, we must instruct the app to fetch the manifest file with the following code in the “scripts/meta tags in header” field in the same “SEO / metatags” tab:
<link rel="manifest" href="manifest.json">
<link rel="apple-touch-icon" sizes="152x152" href="logo-152.png">
<link rel="apple-touch-icon" sizes="120x120" href="logo-120.png">
<meta name="apple-mobile-web-app-status-bar-style" content="default">
The apple touch icon sizes are intended for iOS devices + setting the safari navigation bar hidden when the app is saved in the home screen.
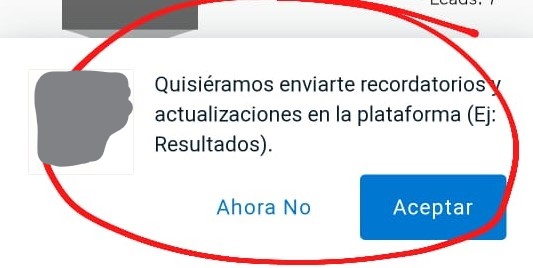
Now, I have found that to get OneSignal to work properly, you must run a javascript code just before using the plugin action: “OneSignal - show notification prompt”. For this, add an action to the “When page is loaded” workflow to run javascript with the following code:
'use strict';

if ('serviceWorker' in navigator && 'PushManager' in window) {
 console.log('Service Worker and Push is supported');

 navigator.serviceWorker.register('sw.js')
 .then(function(swReg) {
   console.log('Service Worker is registered', swReg);

   swRegistration = swReg;
   initializeUI();
 })
 .catch(function(error) {
   console.error('Service Worker Error', error);
 });
} else {
 console.warn('Push messaging is not supported');
 pushButton.textContent = 'Push Not Supported';
}

function initializeUI() {
 pushButton.addEventListener('click', function() {
   pushButton.disabled = true;
   if (isSubscribed) {
     unsubscribeUser();
   } else {
     subscribeUser();
   }
 });

 // Set the initial subscription value
 swRegistration.pushManager.getSubscription()
 .then(function(subscription) {
   isSubscribed = !(subscription === null);

   if (isSubscribed) {
     console.log('User IS subscribed.');
   } else {
     console.log('User is NOT subscribed.');
   }

   updateBtn();
 });
}

function updateBtn() {
 if (Notification.permission === 'denied') {
   pushButton.textContent = 'Notificaciones Bloqueadas';
   pushButton.disabled = true;
   updateSubscriptionOnServer(null);
   return;
 }

 if (isSubscribed) {
   // pushButton.style.display = 'none';
   pushButton.textContent = 'Desactivar Notificaciones';
 } else {
   pushButton.textContent = 'Activar Notificaciones';
 }

 pushButton.disabled = false;
}

function subscribeUser() {
 const applicationServerKey = urlB64ToUint8Array(applicationServerPublicKey);
 swRegistration.pushManager.subscribe({
   userVisibleOnly: true,
   applicationServerKey: applicationServerKey
 })
 .then(function(subscription) {
   console.log('User is subscribed.');
   updateSubscriptionOnServer(subscription);
   isSubscribed = true;
   updateBtn();
 })
 .catch(function(err) {
   console.log('Failed to subscribe the user: ', err);
   updateBtn();
 });
}

function unsubscribeUser() {
 swRegistration.pushManager.getSubscription()
 .then(function(subscription) {
   if (subscription) {
     return subscription.unsubscribe();
   }
 })
 .catch(function(error) {
   console.log('Error unsubscribing', error);
 })
 .then(function() {
   updateSubscriptionOnServer(null);

   console.log('User is unsubscribed.');
   isSubscribed = false;

   updateBtn();
 });
}

function updateSubscriptionOnServer(subscription) {
 if (subscription) {
   console.log(JSON.stringify(subscription));
 }
}

let deferredPrompt;
window.addEventListener('beforeinstallprompt', (e) => {
   e.preventDefault();
   deferredPrompt = e;
deferredPrompt.prompt();
});
While writing this, I just realized this might be redundant and I’m using the main.js code again in the javascript to force the service worker registration. Nonetheless this works perfectly for me.
Do take into account that for PWA support to work the app must comply with the following criteria (taken from https://web.dev/install-criteria/)
"In Chrome, your Progressive Web App must meet the following criteria before it will fire the beforeinstallprompt event and show the in-browser install promotion:
- The web app is not already installed
- Meets a user engagement heuristic ( In practice it means that you need to use the website for a certain amount of time and then the install prompt will appear . Usually it takes a few seconds. Or have interacted with the app previously.)
- Be served over HTTPS
- Includes a web app manifest that includes:
short_nameornameicons- must include a 192px and a 512px iconstart_urldisplay- must be one offullscreen,standalone, orminimal-uiprefer_related_applicationsmust not be present, or befalse
- Registers a service worker with a
fetchhandler"
iOS specifics:
- I use the iOS appearance settings in the “Settings” - “General” tab.

- iOS does not support Push notifications, so take that into account.
Since iOS doesn’t support PWA, you will not get the install prompt you get in Chrome for Android/PC/MacOs, you could show an install prompt on page load, by adding the following code to the “script in the body” field in “SEO / metatags”, or could incorporate it in a “run javascript” workflow action if you want the prompt to show under specific circumstances. Feel free to edit the code to fit your needs. (Prompts are in spanish)
<div class="install-popup" style="display:none;">
<div class="install-popup-card">
<div class="install-popup-close">×</div>
<img class="install-popup-icon" src="" width="100" height="100"/>
<div class="install-popup-message">
Agrega esta aplicación a tu pantalla de inicio, es más fácil y rápido.
</div>
<div class="install-popup-prompt">
Presiona
<svg class="install-icon-ios" version="1.1" id="Layer_1" xmlns="http://www.w3.org/2000/svg" xmlns:xlink="http://www.w3.org/1999/xlink" x="0px" y="0px"
width="168px" height="166px" viewBox="0 0 168 166" enable-background="new 0 0 168 166" xml:space="preserve">
<g>
<polygon fill="#0075FF" points="101,54 101,59 137,59 137,159 37,159 37,59 75,59 75,54 33,54 33,163 142,163 142,54 "/>
<polygon fill="#0075FF" points="84,14.625 84,99 91,99 91,14.619 114.022,37.115 118.648,33.122 87.632,2.043 56.524,33.122
61.032,37.104 "/>
</g>
</svg>
<svg class="install-icon-android" xmlns="http://www.w3.org/2000/svg" width="24" height="24" viewBox="0 0 24 24"><path d="M12 18c1.657 0 3 1.343 3 3s-1.343 3-3 3-3-1.343-3-3 1.343-3 3-3zm0-9c1.657 0 3 1.343 3 3s-1.343 3-3 3-3-1.343-3-3 1.343-3 3-3zm0-9c1.657 0 3 1.343 3 3s-1.343 3-3 3-3-1.343-3-3 1.343-3 3-3z"/></svg>
y después "Agregar a pantalla de inicio"
</div>
</div>
</div>
<style>
.install-popup{
position: fixed;
top: 0;
right: 0;
bottom: 0;
left: 0;
background-color: rgba(0,0,0,0.55);
z-index: 9;
}
.install-popup-card{
background-color: #fff;
width: 86%;
margin: 20% auto;
padding: 14px;
text-align: center;
position: relative;
border-radius: 2px;
}
.install-popup-close{
font-size: 32px;
color: #fff;
position: absolute;
top: -36px;
right: 0;
}
.install-popup-icon{
width: 100px;
height: 100px;
margin-top: 20px;
}
.install-popup-message{
margin: 20px 0;
}
.install-popup-prompt{
font-size: 12px;
}
.install-icon-ios{
width: 24px;
height: 24px;
vertical-align: sub;
}
.install-icon-android{
width: 24px;
height: 24px;
vertical-align: middle;
}
</style>
<script>
jQuery(function(){
window.standalone = navigator.standalone ||
/standalone=true/.test(window.location.href) ||
(screen.height - document.documentElement.clientHeight < 75);
var is = {
iPhone: /iphone/i.test(navigator.userAgent),
iPad: /ipad/i.test(navigator.userAgent),
android: /android/i.test(navigator.userAgent)
};
var iosIcon = $('[rel="apple-touch-icon"]').prop("href"),
icon = iosIcon || $('[rel="icon"]').prop("href"),
$popup = $(".install-popup"),
$icon = $popup.find(".install-popup-icon"),
$close = $popup.find(".install-popup-close");
if (is.iPhone || is.iPad){
$(".install-icon-android").hide();
}else{
$(".install-icon-ios").hide();
}
$icon.prop("src", icon);
$close.on("click", function(e){
$popup.hide();
});
function showInstallPopup(){
$popup.show();
}
if(is.iPhone || is.iPad){
if (!window.standalone){
// not installed, prompt
showInstallPopup();
}
}
});
</script>
For the rest of OneSignal notifications setup, refer to bubble’s instructions in the OneSignal Manual
I also used google developers documentation for push notification setup - Add push notifications to a web app | Google Codelabs
Lighthouse for PWA validation Overview | Lighthouse | Chrome for Developers
Hope this works for all of you, feel free to contribute!