Sure…here goes:
Google App creation
You first need to create an OAuth client app in the Google Console at https://console.cloud.google.com and navigate to “Credentials” in the API section.

Click on “Create credentials” and choose “OAuth client ID”

Select “Web application”, provide a name (not terribly important what it is,) and provide the “Authorized redirect URI’s” for you bubble app. These need to match a page created later in this process, so for this example we are going to add three URI’s:

https://app.mydomain.com/version-test/catch_token
https://app.mydomain.com/catch_token
https://app.mydomain.com/temp_catch_token (only used during setup)

Click “Create” and you will be given your client id and secret:

Your app on the google console is now created, but has not been verified. You can continue testing at this point, but will want to look into the process of verifying your app with Google to prevent your users having to see an unverified message. I’m not covering the verification process here as that is well documented online.
Database Prep
You are going to be storing some values from Google, so you’ll need to setup fields based on your needs. I’m going to illustrate how to simply store these on the Bubble User record. In Bubble, navigate to Data > Data Types > User and create three new fields:
google access_expire_datetime (date)
google_accesss_token (text)
google_refresh_token (text)

Temp Setup Page
To get our API’s initialized, we are going to need a temporary page so we can get a code.
In Bubble, create a page named: temp_catch_token. It doesn’t need anything else, it just has to exist,
API Connector
In Bubble, navigate to Plugins and add the “API Connector” plugin from Bubble.
Click “Add another API” and name this group of API calls. I’m using “GOOG” Authentication should be set to “None of self-handled”
Now we will create a few API calls that will be utilized: two to manage token’s and a sample call to retrieve contacts. After you have the authentication in place, you can simply add more calls to meet your needs.
For each of these, make sure you are working in the GOOG API, and click “Add another CALL” (not “Add another API”.) To modify each call, click the “expand” link on the right side of the call you are working on.
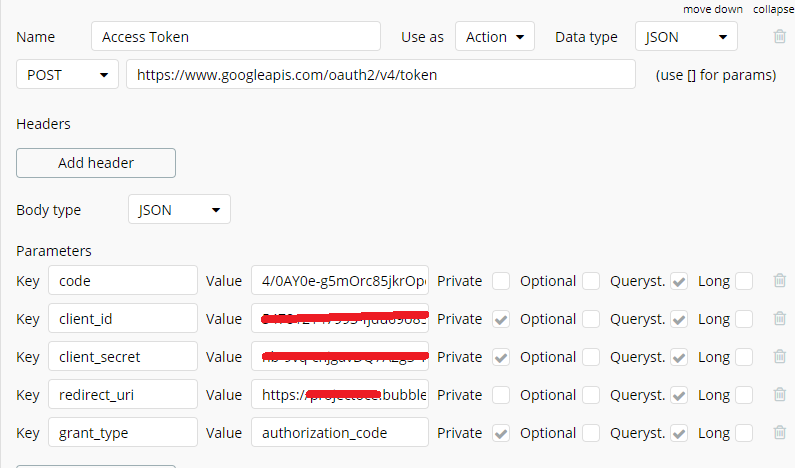
Google Access Token
First up is “Access Token” and should be setup as shown below. The exact key names and values needed are:
code = the code Google provides after hitting the auth url (we’ll get this for testing below)
client_id = the client id provided by google in app creation
client_secret = the client secret provided by google in app creation
redirect_uri = https://app.mydomain.com/version-test/temp_catch_token
grant_type = authorization_code
The items with the “Private” checkbox unchecked, are items that you will be able to dynamically set during your workflows. They all will be set to Querystring. Both type’s are set to JSON and this will be used as an “Action”. To “Initialize the call” we need to manually go through the auth process with Google and use the temp page we created. You can do this by going to:
https://accounts.google.com/o/oauth2/v2/auth?access_type=offline&response_type=code&scope=https://www.googleapis.com/auth/contacts&client_id=MY_CLIENT_ID&redirect_uri=https://app.mydomain.com/version-test/temp_catch_token
Replace MY_CLIENT_ID with your google app client id. What should happen, is you will go through authorization with google, and get returned to your temp token catcher where you can grab the code from the url string in your browser window:
You need to select everything after the ?code=
and copy/paste it into the value for code in the Access Token api call. These codes do expire, and I believe are single use, so if you don’t act fast, just try again.
With all the values in place, you can Initialize the call. If it works, you will get something like this:
Click on the Show Raw data link, and Copy / Paste the values you received for later use.
This call is now ready for use!
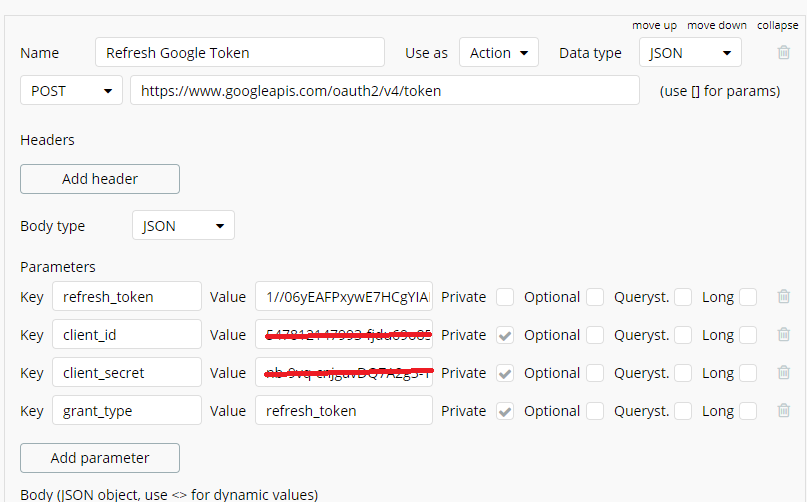
Google Refresh Token
Next up is “Refresh GOOG token”. As with before, use the values shown below, being careful to check all the settings. The exact keys and values are:
refresh_token = the value of refresh_token you just got when initializing Google Access Token
client_id = client id from the google app you created
client_secret = client secret from the google app you created
grant_type = refresh_token
You can now Initialize this call, and again, save the values from the raw data.
This call is now ready for use!
Sample API Call - Get Contacts
And lastly, our sample call to see everything work, “Get GOOG Contacts”. For this one, you need to click “Add header” and add a key with name “Authorization” (no quotes used). The value of Authorization is the word Bearer, followed by a space, followed by an Access Token (not refresh token.) Such as:
Bearer ya29.GluWBTKHr-yE89PbcghkagSCk50xrp2MfRxNKtmjytM9XNENu
For the parameter keys we have (these are specific to what I’m doing, your calls will be different):
alt = json
max-results = 20 (just for testing, can be dynamically set in production)
v = 3
start-index = 1
Time to Initial This Call. If this works, you’ll get a similar screen as the others, but no need to save anything.
Authentication Workflow
Now we are going to setup the workflow for authentication. Create a button on a bubble page and create a workflow event for when it is clicked. The important action item is to “Open an external website” which is found under the Navigation group. You can see in the screenshot that I am actually looking up the values in a database, but you may not need that.

Here is the actual Destination that I build:
https://accounts.google.com/o/oauth2/v2/auth?access_type=offline&response_type=code&scope=https://www.googleapis.com/auth/contacts&client_id=MY_CLIENT_ID&redirect_uri=https://app.mydomain.com/version-test/catch_token
If you dynamically build this, consider that you might have to URL encode values.
A few notes on the values above:
If I recall correctly, scope is a comma separated list of values, so you can do multiple scopes in one auth. MY_CLIENT_ID is the client id you were given by Google when creating your app. If you forgot to save this, you can go back to Google console, get to API credentials, and find the client id and secret. The value for redirect_uri must match one of the Authorized redirect URI’s in your Google app. For testing, it will have version-test.
Token Catcher
This is a page created in Bubble that Google redirects to after a user grants permission. It basically “catches” the code that is sent over by Google, triggers further processing, and redirects the user to a final page.
Here’s what mine does:
I show a popup screen with a spinner to indicate to the user that we are processing the request (Steps 1 and 2 below.) I then take the code provided by Google and go get an Access token, and store what is given to me on the user record. Lastly, I usually redirect to another page, or perform some action (like import contacts.)
Catching the code and getting a token is done by grabbing a url parameter and using the “Access Token” call we created in the GOOG api:

The value for “(parameter) code” is captured like this:
The value for “(paramter) redirect_uri” is a url string. For this demo it would be https://app.mydomain.com/version-test/catch_token
Now it is time to save to our db, what Google provides:
You can see that I’m actually also saving the token type from Google, but this is currently always “Bearer” so not exactly required. The three you need are the access_token, the refresh_token and the datetime of expiration. These all come from the previous step as shown. Google provides expiration as a number of seconds from when it generated the token, so I chose to store that as the current date/time plus the seconds they provide, giving me the datetime of when the token will no longer be valid.
Refresh Token
We refresh the access token, using the refresh token. Anytime I’m about to make an api call, I check the user record to see if the token has expired. If it has, I trigger a refresh, if not, I just hit the actual api call.
The refresh is an action calling the Refresh GOOG token api call we created earlier. You pass the refresh token, and you get back a new access token and new expiration. Save the access token and expiration as you did in the original auth, overwriting the current values. The refresh token never changes.
One note, in testing if you don’t properly save the refresh token, you will never see it again. To get around that, simple go to https://myaccount.google.com/permissions and revoke access to your app.


The actual API call
Now, you are ready to make calls when you need data or take action. Using the sample above as a guide, just create calls that always have the authorization header, but then have the unique parameters and url you need. I think the hard part is the auth, so I’m just stopping here!!!
I have not really proof-read this, so please let me know if you run into trouble–it is very likely I missed something. I’ll be happy to edit so everybody has a good set of instructions in the future.
Good luck!
–Ken


 I took a quick peak at the Docusign api, and it looks to operate very closely to the Google style – once you have a refresh token, you can exchange for access whenever it is expired.
 )
) Quick question: Following your steps, I understand I could read the subject or body of an email that a user receives. However, is it possible to extract such subject/body of an email when an email with a specific subject is received? This is something that I’m currently doing through Zapier (I guess they keep some webhooks open to make sure that a process is triggered every time a email with a specific subject arrives), but I’m not sure if it can be replicated through Bubble with the API process you’ve explained. What do you think? Thanks a lot!